Showing posts with label Spellbinders. Show all posts

Saturday, April 16, 2011

Welcome!


A couple of days ago, we told you about all the new Spellbinder dies that arrived. Debi used the new pennant sets to create this pretty Welcome banner! This photo really does not do it justice, so you'll have to come into the store to get a better look. I took a close up of one of the flags so you could get a better look at it. I had a feeling she would make a great sample with those dies and boy was I right! She said she used the largest of the nested dies for this banner. It comes in smaller sizes in the same set, so you can custom make your banner. I think this would be perfect for birthday party signs or other holidays/events. Thanks Debi!

Thursday, October 21, 2010

Decorative Border Die Cut


I love love love this new die from Heartfelt Creations- Decorative Butterfly and Border die cut set. I just cut the corner piece 4 times and made my own decorative frame for my poinsettia. This set also comes with a butterfly die and a border die with two edges for more versatility.


Supplies:
  • Decorative border die- Heartfelt Creations/Spellbinders
  • Poinsettia die- Spellbinders
  • Brad- American Crafts
  • Cardstock-Bazzil

Wednesday, October 20, 2010

More For The Cardinal Fans...


In case you didn't know... Michele and Tracy love all things cardinal, so you'll likely see it in the store if there's a cardinal on it! Anyway, you can imagine how thrilled they were to find stamps and dies in cardinal designs! Made this card with them in mind...


Punched out the wreath using the Martha Stewart Crafts holly punch. There are two sizes, but this is the smaller size. Instead of using the little bitty dots for the berries, I decided to use my crystals by Kaisercrafts. Sooooo much easier than trying to adhere these teeny tiny dots onto my wreath! Plus they come in various sizes, which give a nice look to the wreath. Then all I did was add the cardinal in the middle of the wreath and a bow. The sentiment was a little trickier to do... cut a strip of 1/2" white cardstock and stamped the Happy Holidays sentiment on it. Then I folded the cardstock back on each end and then forward so that it looks like a banner. Then trimmed the ends for a finished look before adhering to the card.


Supplies:
  • Cardinal stamp and die- Heartfelt Creations/Spellbinders
  • Happy Holidays sentiment- CC's Designs
  • Holly punch- MS Crafts
  • Crystals- Kaisercrafts
  • Ribbon

Tuesday, October 19, 2010

With Love From All Of Us


This card was made from one of the new Heartfelt Creations stamp sets /coordinating Spellbinders. Love the ease of cutting the stamped image so easily with the coordinating dies. Decided to go with a more rustic look for this card (out of my element, I know), and stamped it directly on kraft cardstock. Went over each pine needle with my Copic marker and added some gold stickles as an accent. Colored the pine cones too with Copics.


The sentiment actually comes in the same set as the cardinal stamp, which makes things easy. Don't know if you can tell, but I popped up each cardinal w/pop dots for dimension. Because the card is wide, I had a hard time taking a picture where you could see the cardinals, so I ended up taking a close up for you to see better. To get a better look, you'll have to come in to the store to see it for yourself.


Supplies:
  • Cardinal stamp and matching dies: Heartfelt Creations/Spellbinders
  • Stickles
  • Sentiment- Heartfelt Creations
  • Cardstock- Bazzil

Monday, October 18, 2010

Peace on Earth


Yes!! They are finally here! We've been very excited to bring in these new coordinating stamp and die sets by Heartfelt Creations/Spellbinders!! No more cutting around your image since the dies perfectly coordinate with your stamps. Someone was thinking!


Anyway, wanted to share with you a card I made using the ornament dies and coordinating stamps. All I did was emboss the stamped image onto red cardstock and then cut them out using the ornament dies. To be sure my die didn't shift around I used some removable tape. Easy peasy! Believe it or not the most difficult part about this card was adding on the gold cord.


Heartfelt Creations has come up with several coordinating stamp/die sets, so come and check out the store for all the new goodies! But hurry, sets are limited so, they'll probably sell out quick!

Be back with more samples soon...


Supplies:
  • Ornament stamps and dies- Heartfelt Creations/Spellbinders
  • Gold cord
  • Cardstock- Bazzil
  • Embossing folder- Tim Holtz
  • Gold embossing powder.

Tuesday, October 27, 2009

Spellbinder Pendant Projects

Donna does it again with some great coordinating projects! She used several Sizzix dies as the base for her projects and decorated them with the new Spellbinder pendants. This technique can turn your card or other project into something special since it gives it a lot of dimension.
This first project was made using the Sizzix XL box die. The pendant was cut from the Spellbinder kaleidoscope die and then folded in half to create a cut line. She then cut on the line to the middle of the circle, and folded hill and valley folds. This was repeated again and the two pieces were connected together. Very simple but fabulous!

The the same technique was made using the Spellbinder pendant with the hearts. Donna made this gable box/bag using those small white packages you see throughout the store.


This next bag was made using the Sizzix Scallop Bag #2 die.

Finally, the last project was a bag made from using the Sizzix Cupcake die! Who knew this die was so versatile?
What great creations Donna came up with! If you want to learn how to do this, just ask! If enough people ask, we may do this as one of our Craft Night projects.
Supplies:
Pendants- Spellbinders
Cardstock- Bazzil
DP- Kaisercraft, Doodlebug, Reminisce
Flowers- Prima, Hero Arts
Pearls- Hero Arts
Box, bag, and cupcake die- Sizzix
Paper bags

Wednesday, October 21, 2009

Fleur De Lis Card


Our customer Val made this beautiful card using the new Spellbinder Fleur De Lis pendant. She made the pendant literally pop up off the page! We all had to study it to figure out how she did it! Still can't really figure it out, need to look at it again!
She even added some pretty pearl accents and topped it off with a contrasting red flower and bow.
Thank you Val! This card is breathtaking!

Sunday, September 6, 2009

Cards From Our Customers

Just wanted to share a couple of cards from our creative customers! The first card up was made by Don. He used one of the new Spellbinders Pendant dies as the focal point of his card. The background was embossed using the snow dots cuttlebug folder on vellum.


He even added heart crystals to the tips of the pendant.
Next up we have a Halloween card by Mardi. She dressed up Hope (or is it Grace?) from the Hope and Grace Greeting Farm set to look like a witch for Halloween. Mardi combines all different types of crafts into one neat project. In addition to using paper, rubber stamps and dies, she also embroiders!
Here's a close up of the witch..
The inside of the card is just as cool as the outside!
a

Thank you Mardi and Don for sharing your neat creations with us!

Sunday, July 26, 2009

Thank You Bear


Isn't this bear so cute? He's made by Hero Arts and can be used for all types of cards. Here, Jenny used it to make a Thank You card. The background paper was embossed using the Cuttlebug Embossing folder to give it some depth. The bear was cut out and adhered to the dotted paper using pop dots to give it some dimension and to make him stand out. Jenny also used the Spellbinder dies to frame the bear and topped off the card with a Hero Arts Thank you sentiment.


Don't forget... Spellbinders dies are on coupon starting tomorrw at 40% off!

Thursday, July 23, 2009

Spellbinders Butterflies

Don't you just love how versatile Butterflies are? You can use butterflies on all different types of cards, which make them a great addition to your collection. Donna put together this great card using the Spellbinders Butterfly dies and Sizzix flower and leaves Sizzlit set.


Supplies used:
Butterfly dies- Spellbinders
Flowers and leaves die- Sizzix
Cardstock- Bazzil
Crystals- Hero Arts
Just a note that the Pull Out Pop Up Card Class is on Tuesday 7/28. There was some confusion if the class was on Friday or Tuesday, so to clarify- its TUESDAY!

Saturday, July 11, 2009

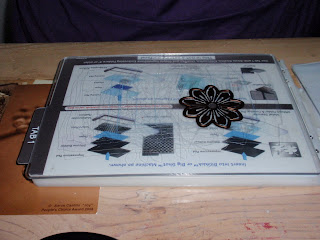
Spellbinder Embossing Mat Tutorial


Have you ever noticed that after you cut with your Spellbinders dies, there is a faint embossing on your image? Can't figure out why the embossing is not as defined as in the samples? Here's the secret... you need the Spellbinder embossing mats to help you!

We've been getting so many requests on how to use the new Spellbinders embossing mats recently, that we decided it was time to do a tutorial on how to use this product. Get out your Big Shots, multi-purpose platforms, cutting plates, spellbinder die (made for embossing), embossing mat, and cardstock and let's get to it!

Step 1: Cut out your image using your big shot/multi-purpose platform with side that cuts the image facing up and with cardstock right side down. Your image will be in the die after you cut it. Keep it there for the next step.

See- cutting side up?


This is what it will look like after you cut the cardstock.

Here's what your image will look like if you flip it over.

Step 2: Now change to tab #1 on your multi-purpose platform. Keeping your cardstock still inside the die, place die with cutting side up again onto cutting plate and lay Spellbinder embossing mats (there are 2) over the die. Put on top cutting plate and run through Big Shot again.


See the difference? The flower on the left was just cut using the die but we did not run it through again with the embossing mat. The flower on the right shows the image that was cut from the same paper, but this time run through again with the embossing mat. The embossing is much more pronounced in the image on the right. Believe me, you'll love the results!
Hope you enjoyed this tutorial... If you'd like to learn more about how to use another product, post a comment here with the product name and what you want to know. We are happy to help if we can!

Friday, April 10, 2009

Spellbinders Samples

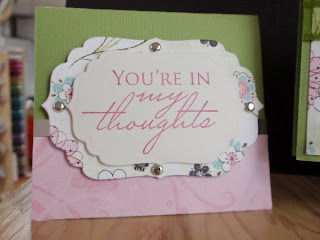
For all you Spellbinder fans out there, have you seen this new Labels 4 Nestabilities set? These labels are perfect for sentiments! The sample shown was cut from the labels die to make a card in the shape of a label.


Supplies used:
DP: Bo-Bunny
Cardstock- Bazzil
Stamp- Hero Arts
Brads- Making Memories

This box was designed by Tracy. Here's the top of the box, which was cut from chipboard and then decorated with the Bo-Bunny paper.


Here's what the box looks like when its open.


Members- don't forget that your Spellbinders coupon ends on April 11th!
Happy Easter!

Sunday, March 15, 2009

Spellbinder Samples


This week's coupon is for 25% off of all Spellbinders! in case you don't know what Spellbinders are, they are wafer thin dies that can be used with your Sizzix Big Shot machine. They are known for their Nestabilities line where you get several sizes of the same shape die (i.e. ovals, circles, scalloped circles, hearts, etc.). This is especially useful when you want to mount one shape onto a slightly larger sized same shape. The dies are only outlines of the shape, so you can easily see your image through the die and can easily place it where you want it cut. Once you start using these dies, you will get hooked and find all kinds of uses for them.

The Honu card featured here was cut with a scalloped circle Spellbinders die. The card was cut keeping the fold in place, so that it would be one piece instead of two. As you can see, several of the scallop circle dies were used in different sizes. The Honu is a Dreamweavers Stencil that was colored using Versacolor Inks and given dimension using the stencil paste.


The second card featured here is by a regular customer, Don Barnes. He created this card by using the Spellbinders heart dies and shaped them into a clover for St. Patrick's Day. How clever! The vines were cut using a Sizzix die. Happy (early) St. Patrick's Day!